
An image can show where a story happens.
A voice can explain why it matters.
Combine the two and an AI-generated story becomes much more than a sequence of pictures.
An AI story generator with images and voice can help turn a written idea into connected visual scenes, then add narration that guides the audience through the story without requiring every piece of information to appear on screen.
That makes the format useful for children’s stories, visual fiction, educational narratives, social videos, narrated story channels and creators who want something more immersive than a static illustrated story.
Novirec Stories is designed around complete visual narratives rather than isolated generations, with formats including Illustrated Story, Comic Story and Video Story. Its public Video Story workflow prepares approved scenes for animation, audio and final video assembly.
Create a Story with Novirec and build your characters and scenes before adding voice to the final experience.
What Is an AI Story Generator with Images and Voice?
An AI story generator with images and voice combines several layers of storytelling.
At minimum, you need:
Story
What happens?
Images
What does the audience see?
Voice
What does the audience hear?
A more complete project may also contain:
- recurring characters;
- multiple scenes;
- animation;
- dialogue;
- subtitles;
- captions;
- music;
- sound effects.
The important point is that these elements should work together.
Imagine a story about a girl who discovers an abandoned lighthouse.
The image might show:
A girl standing at the base of an enormous lighthouse during a storm.
The narration might say:
“Lena had passed the lighthouse hundreds of times, but this was the first night she had ever seen a light inside.”
The picture establishes the location.
The voice adds information the picture cannot communicate on its own.
That is where narrated visual storytelling becomes powerful.
Images and Voice Should Do Different Jobs
One of the easiest mistakes is using narration to describe exactly what the audience already sees.
Image:
Noah opens an old wooden door.
Narration:
“Noah opened the old wooden door.”
The voice adds almost nothing.
A stronger version would be:
“The door had been locked since the laboratory closed thirty years earlier.”
Now the layers complement each other.
The image communicates the action.
The narration communicates the context.
A useful rule is:
Show what can be shown. Narrate what needs to be known.
This produces richer storytelling without unnecessary dialogue or visual clutter.
Why Add Voice to an AI Story?
Voice changes how people experience a visual story.
Without narration, the viewer must interpret the images and read any accompanying text.
With narration, the story can continue even while the visual remains relatively simple.
Voice is particularly useful for:
Backstory
“For ten years, everyone in the village believed the bridge had been destroyed.”
Internal thoughts
“Maya knew she should turn back, but something about the light felt familiar.”
Time jumps
“Three weeks later, they finally reached the northern coast.”
Location changes
“Hundreds of miles away, another signal had already been detected.”
Exposition
“The machine had been built to protect the city, not destroy it.”
Emotional context
“For the first time since leaving home, Leo wondered whether the journey had been a mistake.”
Trying to show all of that information visually can require many additional scenes.
Narration can communicate it in seconds.
A Simple Images + Voice Story Workflow
A practical workflow looks like:
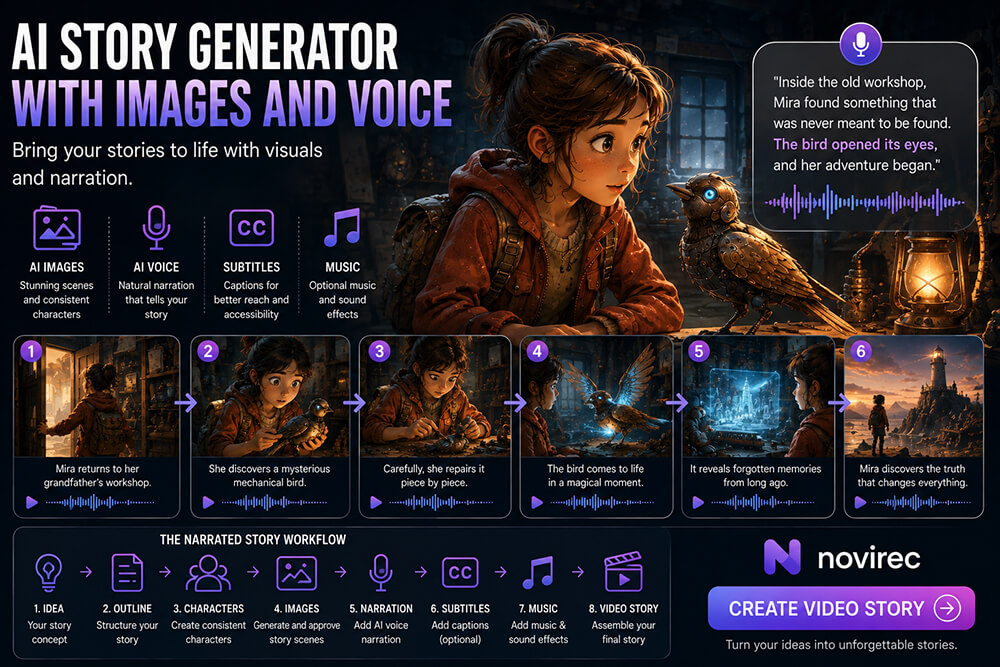
Idea → Outline → Characters → Scenes → Images → Narration → Timing → Optional Subtitles → Music → Final Story
Each step solves a different storytelling problem.
| Stage | Main question |
|---|---|
| Idea | What is the story about? |
| Outline | What happens from beginning to end? |
| Characters | Who appears repeatedly? |
| Scenes | Which moments should be shown? |
| Images | What does each scene look like? |
| Narration | What information should the voice add? |
| Timing | How long does each scene need? |
| Subtitles | Should spoken words also appear on screen? |
| Music | What should the audience feel? |
| Final Story | Does everything work together? |
You do not need to solve every layer at once.
Build them progressively.
Step 1 — Start with a Short Story Idea
You do not need a complete novel.
Consider:
A young girl finds a mechanical bird inside her grandfather’s abandoned workshop. When she repairs it, the bird begins showing her memories that do not belong to anyone in her family.
This gives you:
- protagonist;
- setting;
- mystery;
- important object;
- emotional direction.
That is enough to begin.
Step 2 — Turn the Idea into a Simple Outline
Define the major progression.
For example:
Beginning
Mira visits her late grandfather’s workshop.
Discovery
She finds the damaged mechanical bird.
Activation
After repairing it, the bird projects a strange memory.
Investigation
Mira follows clues hidden inside several memories.
Revelation
The memories belong to someone her grandfather was trying to protect.
Ending
Mira discovers why he left the bird specifically for her.
Now the project has a destination.
Step 3 — Decide Which Moments Need Images
Not every sentence needs its own scene.
A possible visual sequence could be:
Scene 1
Mira enters the dusty workshop.
Scene 2
She finds the bird beneath a cloth.
Scene 3
She repairs it at the workbench.
Scene 4
The bird activates.
Scene 5
A holographic memory appears.
Scene 6
Mira follows the clue to an old train station.
Scene 7
She discovers a hidden room.
Scene 8
The final memory reveals the truth.
That is enough to create a visual narrative.
Step 4 — Establish the Recurring Character
Before generating eight scenes, decide what Mira looks like.
For example:
Age: 17
Hair: Shoulder-length curly brown hair
Eyes: Hazel
Outfit: Rust-orange jacket over a cream shirt
Accessory: Small silver watch inherited from her grandfather
Style: Cinematic illustrated storytelling
Choose an approved visual reference before producing the complete sequence.
Novirec’s current Stories workflow includes a Character Bible used as the canonical visual reference for appearance, outfit, palette and continuity before scene production.
This helps ensure that the viewer follows the same protagonist rather than a succession of similar-looking people.
Step 5 — Create and Approve the Story Images
Now produce each scene.
Do not think about voice yet.
First make sure the visual story works.
For scene one:
Wide view of Mira entering an abandoned mechanical workshop filled with old wooden workbenches, clocks, gears and covered machinery. Evening light enters through dusty windows. Mira wears her rust-orange jacket and looks around cautiously.
For scene four:
Mira sits at the workbench as the repaired mechanical bird opens its wings for the first time. Soft blue light begins glowing from its chest. Mira leans backward in surprise.
The second image should clearly feel like a later moment in the same story.
Before approving it, check:
- Mira’s appearance;
- wardrobe;
- bird design;
- location;
- lighting;
- important objects;
- visual style.
Step 6 — Write Narration After You Know What the Images Show
This is one of the strongest ways to avoid repetitive narration.
If the image is already finished, you know exactly what the audience can see.
Then you can write only what the audience cannot see.
For scene one, the image shows Mira entering the workshop.
Possible narration:
“Mira had avoided her grandfather’s workshop since the funeral. On the evening before it was scheduled to be emptied, she finally went inside.”
The image does not need to show a funeral.
The narration efficiently provides that context.
For scene two:
Image:
Mira discovers the mechanical bird.
Narration:
“Everything else in the workshop was covered in years of dust. The bird was not.”
That creates mystery without explaining too much.
Step 7 — Choose the Right Narration Style
The same visuals can support very different storytelling styles.
Traditional storyteller
“Mira stepped carefully through the workshop, unaware that something inside had been waiting for her.”
Good for:
- children’s stories;
- fantasy;
- fairy-tale narration;
- classic visual stories.
First-person character narration
“I hadn’t been inside the workshop since Grandpa died.”
Good for:
- emotional stories;
- personal narratives;
- mysteries;
- diary-style content.
Documentary-style narrator
“The workshop had remained untouched for almost fourteen years.”
Good for:
- educational stories;
- historical narratives;
- documentary-inspired projects.
Dramatic cinematic narration
“Some memories are forgotten. Others are hidden.”
Good for:
- trailers;
- short cinematic stories;
- social video hooks.
Choose one narrative voice and maintain it consistently.
Step 8 — Do Not Over-Narrate
Voice is useful because it can compress information.
But too much narration can make a visual story exhausting.
If the voice never stops, the audience has no time to experience the imagery.
Consider this scene:
Mira looks at a holographic memory of her grandfather.
You might allow several seconds of silence before narration begins.
Then:
“She had seen that expression before. But never on him.”
The pause gives the image room to work.
Narration does not need to occupy every second.
Step 9 — Decide Whether You Need Dialogue
Narration and dialogue are different tools.
Narration speaks about the story.
Dialogue comes from characters inside the story.
For example:
Narration:
“The bird had not spoken since it activated.”
Then the mechanical bird says:
“Mira?”
That single word could become a major dramatic moment.
You do not need every scene to contain conversations.
Use dialogue when hearing the character directly matters.
Step 10 — Keep the Narrator Separate from Characters When Appropriate
A narrated story can use one consistent narrator while characters remain mostly visual.
This simplifies production and can create a strong identity for the entire series.
For example:
Narrator
Carries the story between scenes.
Characters
Speak only during important moments.
This is especially useful for:
- short-form story videos;
- children’s narratives;
- mystery series;
- educational storytelling.
You avoid turning every sequence into a fully voiced animated film while still benefiting from spoken storytelling.
Step 11 — Match Narration Length to the Scene
Suppose a scene lasts five seconds.
A narration containing fifty words will not fit naturally.
Write for time.
Approximate spoken pacing often falls somewhere around normal conversational reading speed, but the correct pace depends on:
- voice;
- language;
- emotion;
- pauses;
- sentence complexity.
The practical approach is simple:
write → generate/read → listen → adjust scene duration or text.
Do not force narration into a scene because the original paragraph was longer.
Adapt the text to the visual medium.
Step 12 — Use Pauses Intentionally
Not every gap is a problem.
Consider:
“The map ended here.”
Pause.
Mira looks toward the enormous underground door.
Then:
“Whatever came next had never been recorded.”
The silence creates anticipation.
AI narration becomes much more cinematic when pacing is considered part of the writing.
Step 13 — Keep Sentences Easy to Hear
Written prose and spoken prose are not always the same.
A sentence that reads elegantly on a page may sound awkward when spoken aloud.
For voice narration, prefer:
- clear sentence structure;
- natural punctuation;
- manageable sentence length;
- obvious pronunciation;
- controlled rhythm.
Read the narration aloud before finalizing it.
If you struggle to say it naturally, the listener may struggle to follow it.
Step 14 — Narration Can Replace Expensive Visual Scenes
Imagine the story says:
Mira spent the next three weeks searching records in libraries throughout the country.
One approach would be to generate:
- library one;
- library two;
- train journey;
- hotel;
- another archive;
- more research.
But if those moments are not important, narration can compress them.
Show:
Scene A
Mira studying documents.
Narration:
“For three weeks, Mira followed the same symbol through archives scattered across the country.”
Then:
Scene B
She arrives at the location the research revealed.
You communicate weeks of story progression with two strong visuals.
This can reduce production complexity substantially.
Step 15 — Should You Add Subtitles?
Often, yes.
But narration and subtitles are not the same feature.
The voice can exist without displaying every spoken sentence on screen.
Subtitles are useful for:
- accessibility;
- viewers watching without sound;
- noisy environments;
- social feeds;
- language comprehension.
But they should remain optional when the visual story already contains substantial on-screen text or when you want a cleaner cinematic presentation.
A story can therefore use:
Voice ON
and:
Subtitles OFF
without losing narration.
That separation is especially useful for visually dense formats.
Step 16 — Do Not Overload the Screen with Text
A visual story may already contain:
- illustrated text;
- dialogue;
- labels;
- UI elements;
- captions.
Adding large subtitles over everything can make the frame difficult to read.
When subtitles are useful, prioritize:
- readable size;
- strong contrast;
- short phrases;
- good positioning;
- minimal obstruction of faces.
The voice should not force the entire screen to become a text interface.
Step 17 — Time Subtitles to Spoken Words
Poor subtitle timing can make otherwise good narration feel amateur.
Avoid:
- text appearing too early;
- disappearing before speech ends;
- entire paragraphs appearing at once;
- captions lagging several words behind;
- line changes at unnatural points.
Dynamic word-level timing can create more polished captions when available, but simple sentence or phrase grouping can also work well.
The goal is comprehension, not visual complexity.
Step 18 — Add Music After Narration Works
Music should support the voice.
Do not choose music first and then fight to make narration audible over it.
For our mechanical-bird story:
Workshop
Quiet mysterious piano.
Bird activates
Subtle electronic textures.
Investigation
Rhythmic but restrained music.
Final reveal
Larger emotional score.
The soundtrack follows the story’s emotional progression.
Step 19 — Reduce Music During Narration
When someone speaks, intelligibility takes priority.
A common audio technique is ducking:
music becomes quieter while narration is active, then rises again during pauses.
This creates a cleaner mix without removing music entirely.
It is especially useful when narration comes and goes throughout the video.
Step 20 — Let Important Visual Moments Breathe
Suppose the final scene reveals an enormous hidden city.
You may be tempted to immediately explain everything.
Instead:
City appears.
No voice for two seconds.
Then:
“Grandpa had not been trying to hide the city from the world.”
Pause.
“He had been trying to hide the world from the city.”
The visual reveal gets its own moment.
Then the narration adds meaning.
That relationship between image, silence and voice is a major part of good storytelling.
AI Images + Voice vs AI Video
A narrated image story does not necessarily need continuous animation.
You can create several formats.
Narrated slideshow
Still images + voice + transitions.
Fastest and simplest.
Motion story
Images + camera movement + limited effects + voice.
Useful when full AI video is unnecessary.
Animated story
Approved images → image-to-video clips → narration.
More cinematic.
Full Video Story
Multiple animated scenes + voice + captions + music + final assembly.
Most complete production.
Choose the lowest level of complexity that delivers the desired experience.
Not every story needs maximum animation.
AI Images + Voice vs Illustrated Story
An illustrated story emphasizes reading.
The audience controls the pace.
A narrated visual story emphasizes listening and viewing.
The creator controls timing.
| Illustrated Story | Images + Voice Story |
|---|---|
| Reader controls pace | Creator controls pace |
| Written text central | Spoken narration central |
| Static presentation can work perfectly | Timing matters |
| Good for books and pages | Good for video/social |
| Easy to revisit paragraphs | More cinematic experience |
The underlying images may be very similar.
The difference is how the audience experiences them.
AI Images + Voice vs AI Comic
Comics rely heavily on:
- panels;
- speech bubbles;
- captions;
- visual sequencing.
Narrated stories rely more on:
- scene images;
- spoken context;
- controlled timing.
You can combine both, but avoid duplicating every speech bubble through narration unless accessibility or format requires it.
Use a Voice That Fits the Story
The narrator becomes part of the project’s identity.
Consider the difference between:
- calm warm narrator;
- energetic youthful voice;
- deep dramatic storyteller;
- gentle educational voice;
- mysterious cinematic narrator.
The same text can feel completely different.
For children’s storytelling, warmth and clarity may matter more than dramatic intensity.
For mystery:
slower pacing and controlled pauses may work better.
For social content:
a faster and more immediate voice may hold attention better.
Choose based on the audience and genre.
Keep the Same Narrator Across a Series
If you create recurring story content, voice consistency can become as important as character consistency.
Imagine a weekly series.
The audience repeatedly hears the same narrator.
Over time, the voice becomes part of the brand.
This can help with:
- recognition;
- series identity;
- familiarity;
- emotional continuity.
You do not necessarily need a different narrator for every story.
How to Write Narration for Children’s Stories
Children’s narration should generally be:
- clear;
- easy to follow;
- emotionally expressive;
- not overloaded with description.
For example:
Instead of:
“The diminutive penguin cautiously traversed the precariously frozen landscape.”
Use:
“Pip took one careful step onto the ice.”
The image can show the frozen landscape.
The voice communicates the important action.
How to Use Voice for Educational Stories
Narrated visual stories can also teach.
Imagine explaining how volcanoes form through a fictional journey.
Images provide:
- characters;
- diagrams;
- locations.
Narration explains:
- scientific concepts;
- transitions;
- causes;
- conclusions.
A character-driven educational story can make complex subjects easier to follow than a long block of text.
Use Voice for Faceless Story Content
A creator does not need to appear on camera.
The content itself can consist of:
- AI-generated characters;
- story scenes;
- narrator;
- captions;
- music.
This works naturally for:
- YouTube storytelling;
- Shorts;
- TikTok;
- Reels;
- mystery channels;
- educational channels;
- fictional series.
The quality of the story and pacing matters much more than whether the creator appears personally.
Use a Hook Before Long Exposition
For short-form content, do not start with thirty seconds of setup.
Start with a question, surprise or conflict.
For example:
“The robot had been buried for seventy years. It knew Mira’s name.”
Then show the robot.
Now the audience has a reason to keep watching.
After the hook, explain how they reached that moment.
This storytelling technique is especially useful on fast-moving social platforms.
Keep Character Consistency Across Narrated Scenes
Voice does not compensate for inconsistent visuals.
If the protagonist changes every scene, the story still becomes difficult to follow.
Prepare recurring characters first.
Then use narration to connect their journey.
Novirec’s broader platform combines AI Stories with multi-reference image workflows intended to help preserve character identity, clothing, style and scene continuity.
That visual consistency makes narration more effective because the audience does not need to repeatedly figure out who they are looking at.
Narration Can Help Scene Transitions
Voice is particularly useful when moving between locations.
Scene one:
City at night.
Narration:
“By sunrise, Maya was already two hundred miles north.”
Scene two:
Mountain road.
The voice bridges the transition.
Without narration, you might need an extra sequence showing:
- leaving city;
- car;
- road;
- sunrise;
- arrival.
Sometimes those shots are useful.
Sometimes they simply slow the story.
Avoid Explaining Every Emotion
Images and character expressions already communicate emotion.
If Mira looks terrified, avoid:
“Mira was very scared.”
Instead:
“The bird had shown her many memories. This was the first one that had not happened yet.”
The image communicates fear.
The voice explains why.
Do Not Use Narration as a Repair Tool
If the story is visually confusing, adding more voice is not always the solution.
Suppose the viewer cannot tell whether two scenes happen in the same room because the location completely changes.
Narration saying:
“They were still in the same room.”
does not solve the visual continuity problem.
Fix the image.
Narration should enhance storytelling, not explain generation errors.
A Practical Narrated Story Example
Let’s combine the first five scenes.
Scene 1
Visual
Mira enters the workshop.
Narration
“Mira had avoided her grandfather’s workshop for six months. Tomorrow, everything inside would be sold.”
Scene 2
Visual
Mechanical bird beneath the cloth.
Narration
“Almost everything was covered in dust. Almost.”
Scene 3
Visual
Mira repairing the bird.
Narration
“She recognized the mechanism immediately. Her grandfather had taught her how to repair one just like it.”
Scene 4
Visual
Bird activates.
Narration
Silence.
Bird:
“Mira?”
Scene 5
Visual
Holographic memory appears.
Narration
“The woman in the memory was someone Mira had never seen. But she was wearing her grandfather’s watch.”
Notice how little narration is needed.
Each line changes what the audience understands.
How Much Does a Story with Images and Voice Cost?
The total generation requirement depends on the production format.
A narrated slideshow may need:
- scene images;
- narration audio.
A complete animated Video Story can additionally require:
- image-to-video generations;
- alternative clips;
- audio processing;
- final assembly.
Generation usage also varies according to selected models and settings.
Novirec publicly uses a credit-based system with route-aware quotes based on factors such as model, provider, duration, resolution and references.
You can compare Novirec plans before starting.
Existing users can manage plans and credits inside Studio.
How to Reduce Generation Costs
A structured workflow can reduce wasted iterations.
Use:
Story first
↓
Characters approved
↓
Images approved
↓
Narration written
↓
Animation if needed
Do not animate scenes that are already visually incorrect.
Do not generate narration for text you know will change.
Do not generate ten video variations before approving the character.
Resolve inexpensive creative decisions before expensive production decisions.
Common AI Story with Voice Mistakes
Narrating exactly what the image shows
Add information rather than duplication.
Writing narration before scenes
You may end up describing visuals that later change.
Too much narration
Give important images breathing room.
Treating subtitles as mandatory
Voice and subtitles serve different purposes.
Using long written paragraphs unchanged
Rewrite prose for spoken delivery.
Music overpowering the narrator
Voice should remain understandable.
Changing narrator style constantly
Maintain an intentional voice identity.
Ignoring character consistency
Narration cannot compensate for visual drift.
Animating everything unnecessarily
Still images can sometimes communicate the story perfectly well.
No silence
Pauses can create emotion and suspense.
AI Story with Images and Voice Checklist
Before publishing, check:
- Is there a clear beginning, middle and ending?
- Are recurring characters recognizable?
- Does every image represent a useful story beat?
- Does narration add information rather than describe the obvious?
- Is the narration easy to understand aloud?
- Are scene durations appropriate for the spoken text?
- Do important visual moments have room to breathe?
- Are subtitles used only where helpful?
- Is subtitle timing readable?
- Can narration be heard clearly above music?
- Does the narrator’s tone fit the story?
- Does the ending feel complete?
If those elements work, the audience is much more likely to experience the content as a story rather than an AI slideshow.
Frequently Asked Questions
What is an AI story generator with images and voice?
It is an AI-assisted storytelling workflow that combines visual story scenes with spoken narration. It may also include recurring characters, animation, subtitles, dialogue, music and final video assembly.
Can AI generate a story with pictures and narration?
Yes. A practical workflow is to develop the story, establish recurring characters, generate and approve the images, write narration for each scene and then generate or record the voice.
Do I need subtitles if my story already has narration?
No. Narration and subtitles are separate layers. Subtitles can improve accessibility and silent viewing, but they do not need to be enabled for every narrated story.
Can I use only a narrator without character voices?
Yes. A single narrator can carry an entire story while characters remain primarily visual. This is often a simpler production workflow.
Should I generate narration before or after creating images?
Creating the scenes first can make narration easier because you know what the audience can already see. You can then write voice-over that adds context rather than repeating visual information.
Can I animate the images after adding narration?
Yes. Approved story images can become starting points for image-to-video generation when selected scenes would benefit from motion.
Can I add music to an AI narrated story?
Yes. Music can support mood and pacing. Keep it quieter during spoken narration so the voice remains clear.
Create an AI Story with Images and Voice
A narrated AI story works best when its different layers stop competing with each other.
The image answers:
What can I see?
The voice answers:
What do I need to know?
The music answers:
What should I feel?
And the story determines why all three are there.
Start with the narrative.
Build the recurring characters.
Create and approve the scenes.
Then write narration that adds meaning to those visuals.
Add subtitles when they improve accessibility, not simply because voice exists.
Animate the scenes that benefit from movement.
And let silence work when the image deserves attention.
That is how a collection of AI-generated pictures becomes a narrated visual story.
Create a Story with Novirec and build your characters and visual scenes before adding narration.
Want to create individual animated shots? Create an AI Video from an approved image.
New to Novirec? Create your account and begin your first narrated visual story.
Ready to put this workflow into practice?
Open Novirec Studio and start creating with the same tools covered in this guide.